Getting Started#
“CryoSPARC Tools” is an open-source Python library that enables scripting access to the CryoSPARC cryo-EM software package.
Use it for the following use cases:
Programmatically read and write exposure, particle and volume data
Access project, workspace and job data
Build and run jobs to orchestrate custom cryo-EM workflows
Extend CryoSPARC functionality with third-party software packages
Note
This guide documents usage of the cryosparc-tools Python library. For CryoSPARC installation or general CryoSPARC usage instructions, read the official guide.
For usage questions and general discussion about CryoSPARC Tools scripts and functions, please post to the CryoSPARC discussion forum under the Scripting category.
If you would like to request or propose a feature, change or fix for CryoSPARC Tools source code, please either report an issue or submit a pull request.
Source code is available on GitHub.
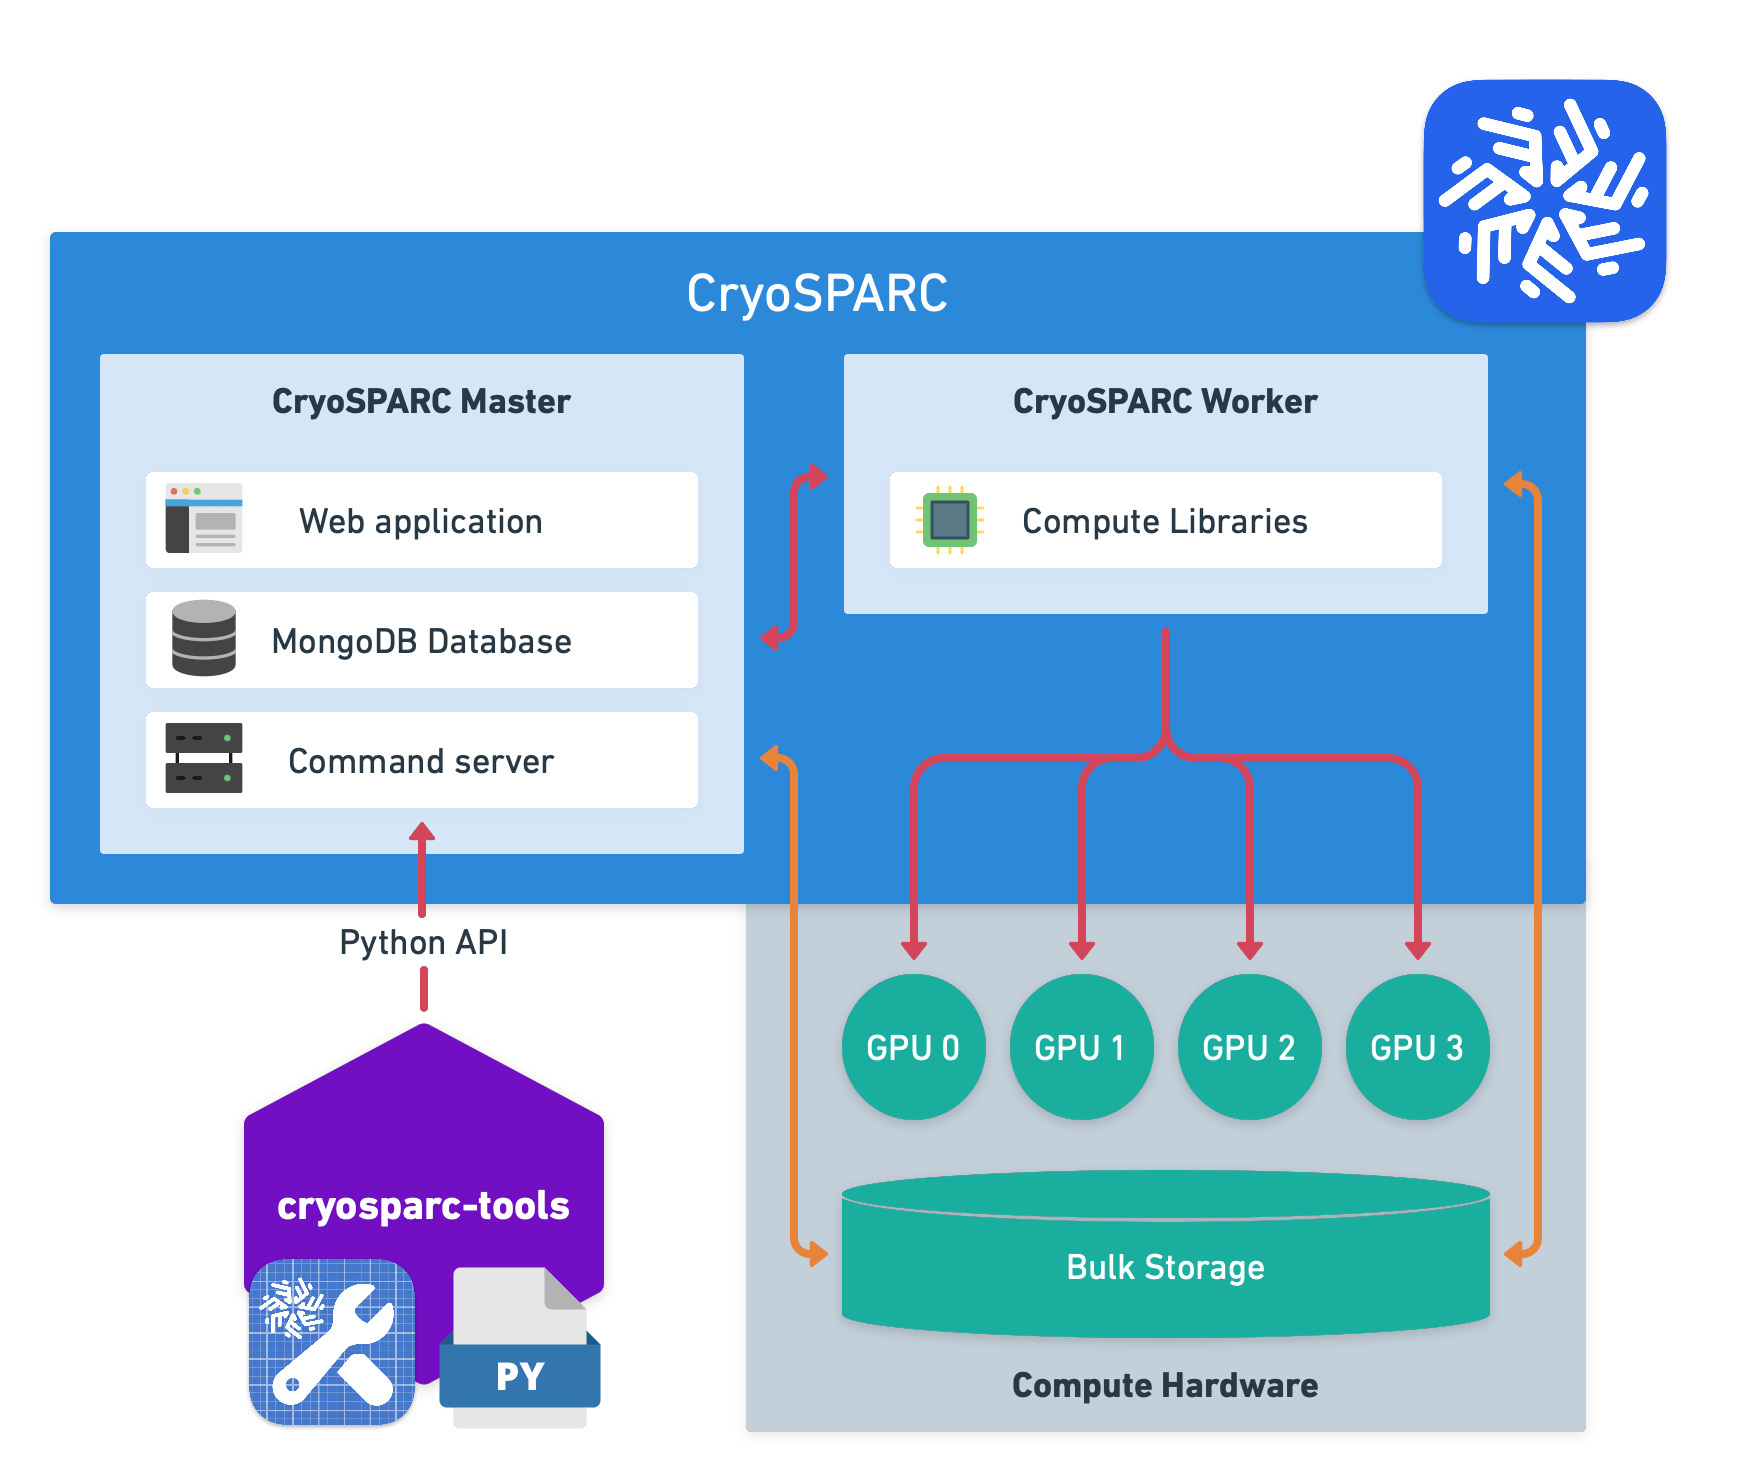
Fig. 1 Overview of how CryoSPARC Tools works: Write Python scripts that load data from CryoSPARC, manipulate it with Python libraries and save it back to CryoSPARC via External job.#
v5#
CryoSPARC and CryoSPARC Tools version 5 were released in January 2026.
Note
Most scripts written for v4 will work with v5 without changes. Scripts that use the internal CryoSPARC.cli, CryoSPARC.rtp or CryoSPARC.vis attributes need to be updated to use the new CryoSPARC.api attribute, or a standard API function.
Pre-requisites#
A terminal program to run commands
CryoSPARC installation must be accessible via one of the following methods:
Running on the local machine
Running on a machine on the same network with
BASE_PORTopen for connectionsRunning at some publicly accessible web URL, e.g.,
https://cryosparc.example.com
Note
CryoSPARC Tools versions prior to v5 require that CryoSPARC instances accessed over SSH have multiple ports forwarded (BASE_PORT + 2, BASE_PORT + 3, BASE_PORT + 5).
As of v5, only the BASE_PORT, e.g., 39000, needs to be forwarded.
See SSH Port Forwarding documentation for more information.
CryoSPARC Tools is only available for CryoSPARC v4.1 or newer. If using CryoSPARC v4.0 or older, please see the Manipulating .cs Files Created By CryoSPARC guide.
Python Environment#
The cryosparc-tools Python library is intended to be used in a dedicated Python environment outside of the CryoSPARC installation. A virtual environment is recommended to avoid conflicts with global Python installations.
Virtual environment tools such as venv, Conda, Mamba, Poetry and uv all work with CryoSPARC Tools.
Ensure that the virtual environment is based on a supported version of Python (see Pre-requisites above).
Installation#
In a terminal, enter the following command to install the latest version of cryosparc-tools from PyPI into the current Python environment:
pip install cryosparc-tools
Alternatively, update an existing installation of cryosparc-tools to the latest version:
pip install -U cryosparc-tools
Note
Use the version of cryosparc-tools that corresponds to your CryoSPARC minor
release version. i.e., if the CryoSPARC version is vX.Y.Z, use the latest vX.Y
tools package. The Z component does not need to match.
For example, if you are running CryoSPARC v4.1.2, install cryosparc-tools with
pip install cryosparc-tools~=4.1.0 (equivalent to pip install "cryosparc-tools>=4.1.0,<4.2").
If you later update to CryoSPARC v4.2.0 or v5.0.0, re-install the corresponding
tools package with pip install cryosparc-tools~=4.2.0 or
pip install cryosparc-tools~=5.0.0 respectively.
Usage#
In a terminal, enter the following command to log in to your CryoSPARC instance:
python -m cryosparc.tools login --url <URL>
Replace <URL> with the URL you use to access CryoSPARC from your web browser, e.g., http://localhost:39000. Enter your CryoSPARC email and password when prompted. This saves a login token to a local file that expires in two weeks.
Note
You only need to log in once, unless the token expires or you change your CryoSPARC password.
Create a new file in a text editor such as VS Code, add the following text:
from cryosparc.tools import CryoSPARC

cs = CryoSPARC("<URL>")
assert cs.test_connection()
Replace <URL> with the same URL specified above.
When run, this script imports the CryoSPARC function, calls it and stores the result in the cs variable. This variable represents a connection to your CryoSPARC instance.
Save the file with a descriptive name, e.g., data_processing.py, and run it in a terminal like this:
cd /path/to/scripts  # replace with the path to the folder where you saved the script
python data_processing.py
You should see the message Success: Connected to CryoSPARC API at <URL> printed to the terminal.
CryoSPARC Tools allows you to query projects, jobs and result datasets. For example, you can add the following code to your script to print the paths of all micrographs in a motion correction job with ID J42 in project P3:
project = cs.find_project("P3")
job = project.find_job("J42")
micrographs = job.load_output("micrographs")

for mic in micrographs.rows():
    print(mic["micrograph_blob/path"])
You may also load and save CryoSPARC dataset files. This assumes the project directory is available on the same file system as the script:
from cryosparc.dataset import Dataset

path = project.dir / "J43" / "particles.cs"
particles = Dataset.load(path)

shift_y, shift_x = particles["alignments2D/shift"].T
mic_shape_y, mic_shape_x = particles["location/micrograph_shape"].T
new_loc_x = particles["location/center_x_frac"] * mic_shape_x - shift_x
new_loc_y = particles["location/center_y_frac"] * mic_shape_y - shift_y
particles["location/center_x_frac"] *= new_loc_x / mic_shape_x
particles["location/center_y_frac"] *= new_loc_y / mic_shape_y

particles.save(path)
If the project is on a remote machine, you may download the dataset locally first:
particles = project.download_dataset("J43/particles.cs")
shift_y, shift_x = particles["alignments2D/shift"].T
...
project.upload_dataset("J43/particles.cs", particles)
Browse the included guides and examples to get a better idea of what you can do with CryoSPARC Tools.
For full details about available functions and classes in CryoSPARC Tools, including their capabilities and expected arguments, read the API Reference. The cryosparc.tools module is the best place to start.
Jupyter Notebooks#
We recommend writing and using CryoSPARC tools in a Jupyter notebook. Jupyter notebooks allow for a more interactive and iterative use of Python.
In a Jupyter notebook, time-consuming steps (like data loading) can run a single time without slowing down later steps (like plotting) which are quick, but depend on those earlier steps.
To install Jupyter:
pip install notebook
Run Jupyter:
jupyter notebook
Note the login token in the output.
This starts a Jupyter Notebook server at http://localhost:8888 on the current machine. Optionally provide the following arguments to make Jupyter available to other machines on the local network:
jupyter notebook --no-browser --ip=0.0.0.0 --port=8888
Running the Examples#
The example Jupyter notebooks require additional dependencies to run. Use conda or mamba to create a new Python environment with the required dependencies. Here, the environment is named cryosparc-tools-example but any name may be used:
conda create -n cryosparc-tools-example -c conda-forge python=3 numpy==1.18.5
conda activate cryosparc-tools-example
pip install matplotlib~=3.4.0 pandas==1.1.4 cryosparc-tools
For speed, these do not include the dependencies for the crYOLO example notebook. Optionally install crYOLO with these commands:
conda install -c conda-forge pyqt=5 libtiff wxPython=4.1.1 adwaita-icon-theme 'setuptools<66'
pip install 'cryolo[c11]' --extra-index-url https://pypi.ngc.nvidia.com
Then proceed with the Jupyter notebook installation above.
Example notebooks ran on Ubuntu Linux with x86-64 bit architecture.
Next Steps#
Examples
- 1. Re-center Particles
- 2. Pick particles with crYOLO
- 3. 3D Flex: Custom Latent Trajectory
- 4. 3D Flex: Custom Mesh Rigidity
- 5. Generate High-Res 2D Classes
- 6. Import from EPU XML File
- 7. Custom Workflow
- 8. Delete Rejected Exposures
- 9. Revert downsampled, symmetry expanded particles
- 10. Connect a volume series to Class3D
- 11. Managing a CryoSPARC Live Session from the CLI
API Reference
- Modules
- cryosparc
- api
- auth
- cli
- constants
- controllers
- dataset
- errors
- json_util
- model_registry
- models
- api_request
- api_response
- asset
- auth
- benchmarks
- config
- diagnostics
- event
- exposure
- external
- file_browser
- gpu
- instance
- job
- job_register
- job_spec
- license
- notification
- params
- preview
- project
- resource
- scheduler_lane
- scheduler_target
- service
- services
- session
- session_config_profile
- session_params
- session_spec
- signature
- tag
- user
- when
- workspace
- mrc
- platform
- registry
- search
- spec
- star
- stream
- stream_registry
- tools
- util
- cryosparc
Questions, Bug Reports and Code Contributions#
Read the contribution guide for full details.
If you publish an open-source tool that uses this package to GitHub, add the
cryosparc-tools topic to your repository so others may discover it.
Browse tagged packages here.
License#
CryoSPARC Tools is licensed under the BSD-3-Clause license. View full license text.