4. 3D Flex: Custom Mesh Rigidity#
Note
Read the tutorial to learn more about 3D Flexible Refinement.
This example covers the following:
How to read a 3DFlex Mesh from a 3DFlex Mesh Prep Job
How to modify the rigidity weights of the mesh
How to save this updated mesh back to CryoSPARC
Also described is the expected format in which mesh objects are represented to allow creating custom meshes and saving them it in the correct format within CryoSPARC.
import numpy as n

from cryosparc.tools import CryoSPARC

cs = CryoSPARC(host="cryoem5", base_port=40000)
assert cs.test_connection()
Connection succeeded to CryoSPARC command_core at http://cryoem5:40002
Connection succeeded to CryoSPARC command_vis at http://cryoem5:40003
project = cs.find_project("P251")
job = project.find_job("J23")
4.1. Load the mesh_data from an existing 3DFlex Mesh Prep job#
The mesh data in CryoSPARC is stored as a python pickle file containing several numpy arrays defining the mesh.
mesh_dset = job.load_output("flex_mesh", ["mesh"])
mesh_path = mesh_dset["mesh/path"][0]
import pickle

with project.download(mesh_path) as mesh_file:
    mesh_data = pickle.loads(mesh_file.read())

mesh_data.keys()
dict_keys(['mask', 'mask_soft', 'map_r', 'map_r_masked', 'N', 'psize_A', 'tm_points', 'tm_cells', 'tm_tetraidx_map', 'tm_rweights', 'segmask', 'segmask_exp', 'segfuses', 'tm_segmask', 'version'])
mesh_data has the following keys:
mask: a hard binary mask that defines the protein region (i.e. a solvent mask)mask_soft: a soft mask that is within maskmap_r: the input consensus densitymap_r_masked: the input consensus density, masked by mask_softN: the box sizepsize_A: the pixel sizetm_points: an array of (num_vertices x 3) point locations defining the mesh nodestm_cells: an array of (num_cells x 4) indices of point defining the tetra elementstm_tetraidx_map: an (N x N x N) map, each voxel has the index of the tetra element to which it belongs. -1 in solvent regionstm_rweights: an array (num_cells) values that define the relative rigidity weights of each tetra elementsegmask: the segmentation mask that was used to define this meshsegmask_exp: an expanded segmentation mask that partitions the solvent masktm_segmask: an array (num_cells) of indices that labels each tetra element with which segment it comes fromversion: a version number of this file
To define a custom mesh, provide a mesh_data pickle file with at least the following keys:
maskmask_softNpsize_Atm_pointstm_cellstm_tetraidx_maptm_rweightsversion= 1
4.2. Customize the rigidity weights#
In this example, we will customize the rigidity weights of the mesh. The new rigidity weights will be based on the distance of each tetra cell from the origin, just as an example. This weighting is unlikely to be useful in practice but shows how you can customize the weights based on any other information you wish to use.
N = mesh_data["N"]
tm_rweights = mesh_data["tm_rweights"]
%matplotlib inline
from matplotlib import pyplot as plt


def plot_slice(data):
    plt.imshow(data[:, :, N // 2], origin="lower", interpolation="nearest")
    plt.colorbar()
plot_slice(mesh_data["tm_tetraidx_map"])
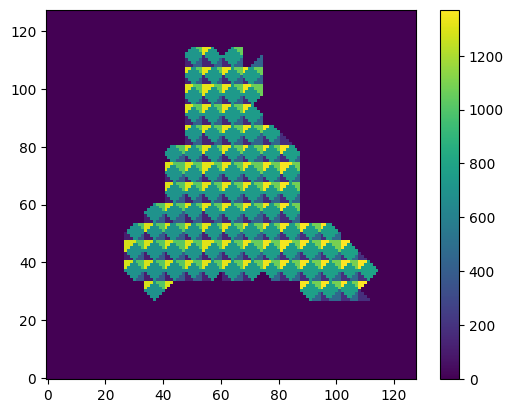
def get_map_from_tm_data(tm_data, bg=0):
    tm_tim = mesh_data["tm_tetraidx_map"]
    res = tm_data[tm_tim]
    res[tm_tim < 0] = bg
    return res
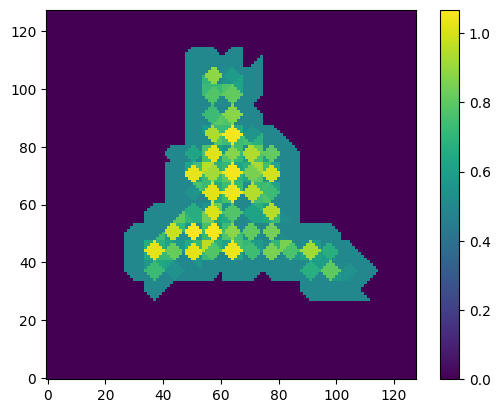
map_rweights = get_map_from_tm_data(mesh_data["tm_rweights"])
plot_slice(map_rweights)
tm_points = mesh_data["tm_points"]
tm_cells = mesh_data["tm_cells"]
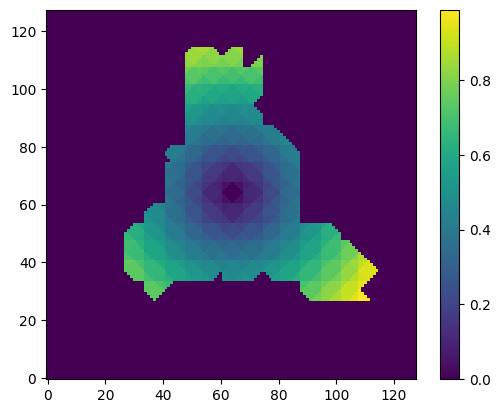
Compute the distance of each tetra cell from the center of the box and use this as rigidity weights (just as an example).
tm_dist = n.linalg.norm(tm_points[tm_cells].mean(axis=-2), axis=-1)
tm_rweights_new = tm_dist / tm_dist.max()
map_rweights_new = get_map_from_tm_data(tm_rweights_new)
plot_slice(map_rweights_new)
4.2.1. Saving the result#
Use the same mesh_data object, replacing the tm_rweights with the new values. Upload this file to CryoSPARC and then save the result as a job linked to the original mesh generation job for bookkeeping.
mesh_data["tm_rweights"] = tm_rweights_new
mesh_stem = mesh_path.rsplit(".", 1)[0]
mesh_path_new = mesh_stem + "_new.pkl"
project.upload(mesh_path_new, pickle.dumps(mesh_data))
mesh_dset[0]["mesh/path"] = mesh_path_new
cs.save_external_result(
    project_uid="P251",
    workspace_uid="W4",
    dataset=mesh_dset,
    type="flex_mesh",
    name="mesh",
    slots=["mesh"],
    passthrough=("J23", "flex_mesh"),
    title="Custom mesh",
)
'J24'